How to Test Moisture for Hardwood Flooring Installation Properly
Flooring Fundamentals
You'll probably understand, because you're one of us. You value your floor. And that means yes, we take wood seriously. We're barking up the same 'tree.' That may not be a saying - which is fine, actually, because we're not known for turn of phrase, we're known for getting the most out of a floor. It is humbling and exciting that in this case, it's yours.
So, when learning about what will be your floor, you won't be surprised to hear...(drumroll): Approximately 85% of all hardwood flooring installation failures result from moisture problems. Or to be more accurate: failure to recognize and mitigate moisture issues that can affect the flooring being installed.
Therefore, the purpose of this, rather uncompromising document, is to outline typical moisture testing, planning and procedures. We want your installation be a successful one. (For a successful person, we might add.)
Start with this important note, which spells out that a quality flooring product is our responsibility, and while we may send it holiday cards, we are not responsible for its experiences 'out in the world.'
Please read entirely, and if you need help or have questions, call to be connected with the Tech and Install Team 800-651-1635
Testing subfloors
You may be asking Wait, what? I thought we were installing wood flooring, why are we testing the subfloor?
Maybe the following will help give you some answers.
Wood Subfloors
At the time of installation, it is important to know the moisture content of not only the wood flooring, but of the substrate as well. Moisture from the subfloor can impact your flooring if it is not recognized and addressed, causing cupping, buckling and other moisture related issues.
Due to the variability in wood subflooring materials, such as the different species of woods used in the production of wood subfloors, and the non-wood resins and adhesives used within them, it is difficult to get an accurate moisture reading of this material. Check with the moisture meter manufacturer for proper settings, testing methods, and correction values when testing wood subfloor materials.
When in doubt, check the moisture content of other properly conditioned wood materials
(2x4s, newel posts, wood beams, etc.) within the structure in order to get an idea of where the
EMC is in comparison to where it should be, and then compare this value with the EMC chart as a baseline for testing the subfloor.
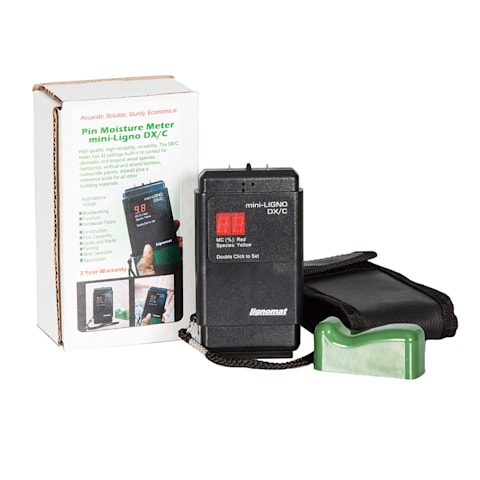
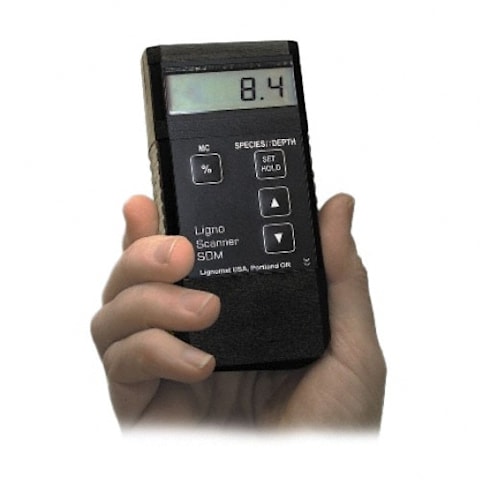
Use a meter that is species / material adjustable. E.g. Ligno-scanner SDM or mini-Ligno DX/C moisture meter or after calibrating your meter to the subfloor material being tested, take MC readings in a minimum of 20 test locations for up to the first 1,000 square feet, and an additional 4 readings per 100 square feet thereafter, and average the results. Testing locations should be representative of the entire project and include a minimum of three tests per room receiving wood. Pay special attention to exterior walls and plumbing. Elevated readings should be addressed prior to delivery and installation of any wood flooring. In general, more readings will result in a more-accurate average. Record, date, photograph, and document all results.
The MC of the subfloor should coincide with the expected in-use (e.g., normal living) conditions of the facility, based on the EMC chart. Anything outside of this range would be considered unusually high.
In hot and humid climates, and during the humid season, the subflooring should not exceed
13% moisture content (MC).
Any unusually high MC readings must be identified, documented, and addressed in order to establish the size and magnitude of the problem area. Installation should not proceed until the origin of the moisture has been identified and remedied.
1. IMPORTANT: Never install a wood floor over a known moisture condition. A known moisture condition is one that you are aware of, and could pose future damage to the flooring, the building, or the occupants. It is compulsory practice to always test for moisture regardless of conditions so that any unknown conditions can become known conditions, which then can be handled appropriately.
2. The traditional standard for protecting wood and wood products from rot or decay is to keep the moisture content below 19 percent. Studies have shown, however, that mold growth can occur on wood at moisture content levels above 15 percent, and corrosion of metal fasteners can occur when moisture content exceeds 18 percent. Reaching these moisture content levels does not mean rot, decay, mold growth, or corrosion will occur, but does raise a potential concern. In all cases, it is important that the installer consult with all involved parties including the manufacturer and customer.
G. Another key variable of the moisture content of wood subfloors involves what is going on below the subfloor.
1. When the space below the subfloor is controlled and conditioned to the same temperature and RH as above the floor, the moisture content through the thickness of the subfloor material should be the same.
2. When conditions below the subfloor are unconditioned, the moisture content will vary through the thickness of the subfloor system. This difference may affect the installed wood flooring and can result in damage.
3. Do not install a wood floor over an unconditioned space without addressing the moisture situation.
Concrete Subfloors
It is extremely important to test for moisture on every flooring job. Even when the adhesive manufacturer states “no moisture testing is required,” it is still in your best interest to moisture test, and document the results. Doing so will minimize the risk of failure, it will meet the flooring manufacturer’s warranty requirements, it will fulfill your contractual obligation as the flooring professional, and it will minimize your liability if a failure does occur. In cases where there is not an effective vapor retarder in place directly below the slab, the results of any type of moisture test are likely to increase as moisture from the ground will enter and raise the moisture level in the concrete once it is covered.
A. All concrete moisture tests indicate a condition of the concrete floor slab at the time of the test under the ambient conditions of the test, and may not predict future conditions of the floor slab.
These tests do not indicate a permanent condition of the substrate. This is especially true if an effective moisture vapor retarder is not present or has been compromised by damage or by improper installation.
B. Conduct tests to give you the ability to know when to start or not start a job, and to determine what products and systems will be necessary in order to install the floor. All concrete slabs, regardless of age, will exhibit changes in moisture over time.
C. As concrete moves through its initial drying period, regular testing of moisture content to evaluate the drying condition of the slab may begin 30 days after placement.
D. Appropriate moisture testing, specified by the flooring and/or adhesive manufacturer, is the only way to identify if moisture levels in the slab are adequate for the systems being used.
E. All tests should be performed as dictated by the ASTM standard.
1. ASTM 1869 Calcium Chloride:
A calcium chloride moisture test is a standard test method for measuring the moisture vapor emission rate (MVER) of a concrete subfloor using anhydrous calcium chloride. The results of this test give quantifiable values.
a. Results are shown as pounds of water over a 24-hour period, per 1,000 square feet.
b. Ambient conditions must be 65°-85°F and 40-60% relative humidity for a minimum of 48 hours prior to conducting the test.
c. Each prepared area must be 20”x 20,” clean, and free of all foreign substances.
d. Lightly grind the area to produce a surface profile equal to a concrete surface profile (CSP) 1-2, a minimum of 24 hours prior to testing.
e. Weigh the calcium chloride in its container.
f. Place the opened calcium chloride container on the prepared area and immediately cover it with a transparent cover to create an airtight seal.
g. Let the covered container sit for 60-72 hours undisturbed.
h. Remove the transparent cover and calculate as directed by the calcium chloride test kit manufacturer.
i. Place three kits in the first 1,000 square feet and one per every 1,000 square feet thereafter.
j. Record the data.
k. Concrete slabs with a calcium chloride MVER reading of greater than 3 lbs/ 1,000 square feet/24 hour are strongly recommended to wait for further drying of the slab, or install/apply a minimum class 1 impermeable vapor retarding membrane over the slab according to the adhesive manufacturer’s instructions, prior to installation.
ASTM 2170
Relative Humidity:
Relative humidity moisture testing is the standard test method for determining relative humidity in concrete floor slabs using in-situ probes. The results of this test give quantifiable values and may be used to test lightweight concrete and gypsum-based underlayments. a. This method predicts what the equalized relative humidity will be through the entire thickness of the slab once it is covered with flooring material.
b. Normal living conditions should be maintained for 48 hours prior to testing.
c. Calibration of reusable probes should be checked before every job, or if not used for 30 days.
d. To perform the test, drill a hole in the slab at the following thickness:
i. If the slab is drying from top only (e.g. slab on-grade or in fluted metal decking), drill holes to 40% of the slab thickness.
ii. If the slab is drying from top and bottom (e.g., suspended slab), drill holes to 20% of the slab thickness.
e. The hole diameter is determined by the manufacturer’s sleeve size.
f. Tests should be placed within 3 feet of each exterior wall.
g. Conduct three tests for the first 1,000 square feet and one for every 1,000 square feet thereafter.
h. Insert the sleeve, cap it, and allow it to acclimate for a minimum of 24 hours.
i. The meter reading must not drift more than 1% relative humidity over a five-minute period. When leapfrogging reusable probes, allow at least 1 hour to achieve a true 1% drift in 5 minutes.
(Leapfrogging is when reusable probes are being used. An example would be a project where you have 50 holes drilled, lined and capped. However you only own 10 probes. When those ten probes are removed from the first 10 hole liners, allowed to acclimate with the ambient conditions, and then placed in the next ten liners, it is referred to as “leapfrogging.”)
j. Record the data.
k. Always follow manufacturer guidelines for testing procedure.
l. Concrete slabs with a RH reading of more than 80% are strongly recommended to wait for further drying of the slab, or install/apply a class 1 impermeable vapor retarding membrane according to the adhesive manufacturer’s instructions, prior to installation.
ASTM F2659 Electrical Moisture Meter:
Nondestructive electrical moisture meters are the standard guide for preliminary evaluation of the comparative moisture condition of concrete, gypsum cement, and other floor slabs and screeds. It is a nondestructive testing method. These tests should be used to evaluate the surface of the concrete and to determine where to place other quantifiable tests. These tests provide useful information, but should not be used on their own to determine whether a floor should or should not be installed unless otherwise directed by the flooring manufacturer.
a. To ensure accuracy, the meter should be calibrated before every project or if not used for 30 days.
b. The interior environment of the jobsite should be 65°-85°F and 40-60% relative humidity for at least 48 hours prior to testing.
c. The temperature of the floor slab is to be tested and reported within 8” of each test area.
d. Eight tests should be conducted for the first 1,000 square feet and 5 additional tests should be conducted for each additional 1,000 square feet with 3-5 tests per test site. Be sure to record the highest reading. Each test area should be within a one-foot-by-one-foot area.
e. This test shows a moisture condition in the upper one-inch of the slab.
f. It is very useful for mapping areas for further qualitative tests.
g. There are three types of electrical moisture meters: impedance, capacitance, and field charge detecting.
There are other tests that are used but are not as common.
ASTM D4944 Calcium Carbide Gas Pressure Test – accepted by some manufacturers
ASTM D4263 Plastic Sheet Method -This test can provide useful information, but should NOT be used to determine whether a floor should or should not be installed.
Moisture and your flooring:
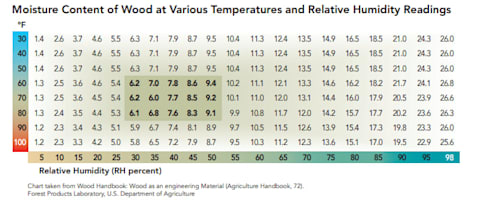
The effects of Temperatures and Humidity on wood flooring
Wood products are sensitive to moisture, temperature and humidity. Refer to the chart below to better understand the best in-home environmental relationship between relative humidity (RH) and temperature and its effects on wood moisture content. Determine the current temperature and RH within your home with a hygrometer. Find the combination of temperature and RH in your area on the chart (temperature variations are listed on the left side of the chart, humidity variations are listed along the bottom).
Example: The target or ideal moisture content for wood products is shown in the shaded area to be within 6.1% to 9.4% Wood flooring will perform best when the interior environment is controlled to stay within a relative humidity range of 30% - 50% or 45% to
65%, for example, and a temperature range of 60° to 80° Fahrenheit. (In some geographical areas, the ideal humidity range might be higher or lower, 30% - 50% or 45% to 65% for example). It is critical to maintain the relative humidity in your home to not fluctuate more than 20% at any given time of the year. Hardwood flooring installed in areas with a wider variation in RH (fluctuation in RH of more than 20%) can negatively impact board performance and may result in excessive movement (expansion / contraction, squeaks, board gapping, board-edge cupping, finish splits and other related issues).
TEMPERATURE:
For best product performance, ensure the temperature in the home is between 60º and 80º F before, during, and after installation and for
the life of the flooring.
RELATIVE HUMIDITY:
For best performance, flooring should be ideally conditioned, installed and maintained to consistent indoor temperatures of 60°- 80° F and relative humidity of 30% or above to 70% or below with a maximum fluctuation of 20%, before, during and after the installation and for the life of the flooring). Ideal interior environmental conditions will vary from region to region and jobsite to jobsite, the relative humidity figures on your project maybe higher or lower.
The key is to ensure that the change in relative humidity stays within a 20% range (e.g.30% to 50% or 35% to 55% etc…) and does not fluctuate beyond 20% for sustained periods, enough to affect the flooring. Home environments where the indoor Relative Humidity levels are below 30% or above 70% are not recommended.
Not following the written recommendations can negatively impact board performance and may result in excessive movement, squeaks, board gapping, board-edge cupping, cracks, twists, finish splits, flaking, chipping, fading and other related issues.
Any home that may have a sustained change in relative humidity greater than 20% fluctuation needs an HVAC system equipped with a humidifier or dehumidifier to regulate the interior environment within a 20% range of fluctuation. Installing hardwood in an environment that is not maintained can be detrimental to the flooring.
The map below can be used to calculate what the optimum baseline or average moisture content of interior wood products should be prior to installation for each state and region. The first number indicates the average moisture content of wood during the wintertime (months having lower humidity), and the second number indicates the average moisture content during the summer time or (months having higher humidity).
To calculate the optimal baseline or average wood moisture content in your state or region, add the high season number and low season number together then divide by two. Example: If your state or region has an expected low of 6% to a high of 12% moisture content, the average baseline moisture content of the wood before installation would be 9%. The goal is to acclimate the flooring to this average figure and then the installation can begin.
Very dry or humid regions of the country usually
The most reliable moisture-content numbers will be obtained using a species-specific moisture meter to determine the moisture content of the wood flooring.
The USDA moisture map is a helpful guide for installations. Without proper temperature, humidity and ventilation controls, actual moisture content in any location may differ significantly from these numbers. In all cases it is the installer or homeowner’s responsibility to determine if the indoor environment, moisture content and jobsite conditions are suitable for wood floor installations.require extended conditioning to balance the new flooring to the environment it will service.

MOISTURE TESTING:
Use a meter that is species / material adjustable. E.g. Ligno-scanner SDM or mini-Ligno DX/C moisture meter.
Check the moisture content of multiple planks. It’s recommended to randomly test 40 boards for up to the first 1,000 square feet, and an additional 4 readings per 100 square feet thereafter, and average the results.
As a guide, the flooring’s average moisture content must be within 4% of the subfloor for strip flooring (boards 2-1/4” or less) and 2% for plank flooring (3” or wider).
When wood subfloor readings are not available calculate the moisture content for the ambient conditions in the home or compare with other wood products in the home, e.g. trim.
Any unusually high or low moisture readings should be isolated and not installed in the floor.
Keep a permanent record of all readings.
Please note that manufacturer’s installation guidelines should always be reviewed before commencing installation.
References: NWFA and LL Flooring Installation Guidelines
LL Flooring Technical and Installation