


How to Install Tongue and Groove Flooring
Learning how to install tongue and groove flooring properly is crucial for quality results. Get tips on this hardwood installation method from LL Flooring.
Visit one of our stores or glance at our website, and it’s clear there’s quite a variety of flooring options. However, did you know that along with that variety come different installation methods? The profile of your flooring boards will determine which method you employ. For instance, solid hardwood (and some engineered hardwood) feature a tongue and groove profile, which requires particular installation methods.
Installing tongue and groove flooring can be challenging, so you may prefer to leave this task up to the professionals. But, if you’re curious about how it’s done or are an experienced DIYer who feels up to the job, here’s an overview of what to expect.
What Is Tongue and Groove?
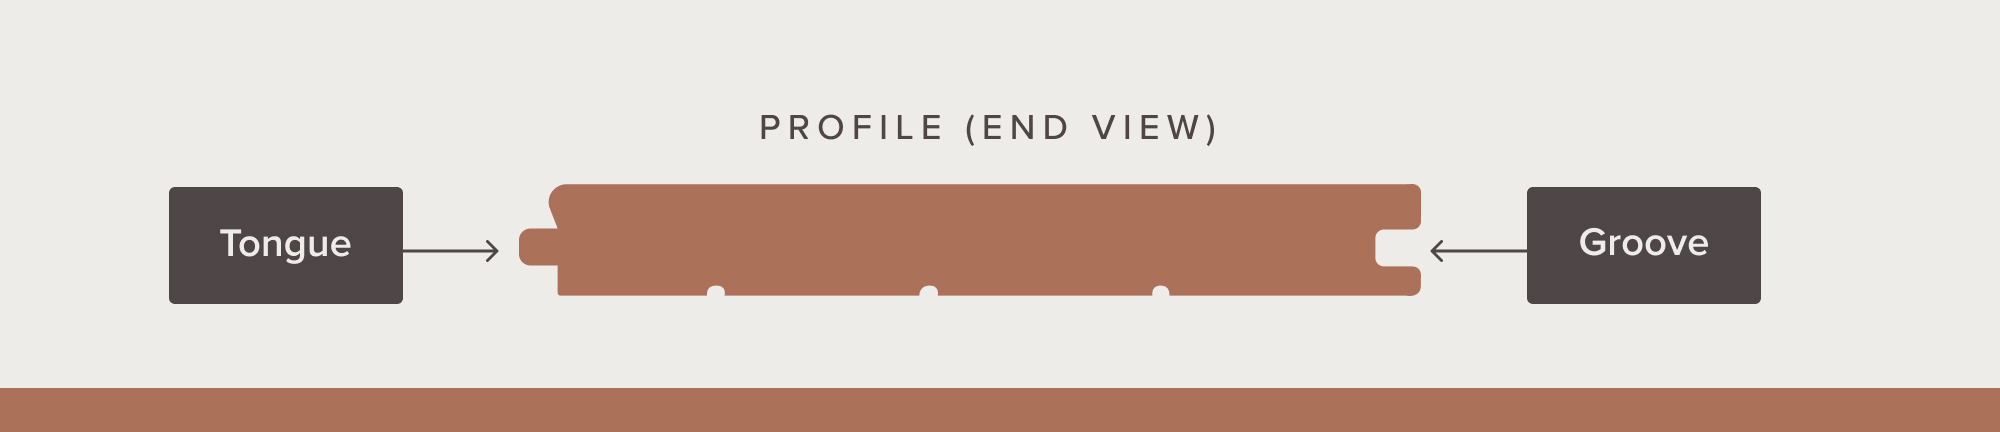
If you look around the edges of your tongue and groove hardwood boards, you’ll see the ridge side of one board is fitted into the groove side of an adjacent board, creating a snug seam. Fitting the tongue into the groove is basically what joins the two boards. But there’s more to knowing how to install tongue and groove hardwood flooring than just that simple part of the process, especially if you want a stable and secure floor that will perform as intended.
Do You Nail Down Tongue and Groove Flooring?
Nailing down is probably the most common installation method for tongue and groove flooring. You can also glue it in place or use a combination of nails and glue. Check the Warranty, Installation, and Care (WIC) guide for your particular flooring product to find the installation methods allowed for your floors. You’ll also find step-by-step instructions for properly installing your flooring.
Your tongue and groove flooring installation guide includes instructions regarding the tools you’ll need, subfloor preparation—a subfloor is a layer above your joists that acts as a foundation for your underlayment and the surface of your flooring—and instructions for how long it takes to acclimate your boards before installation. It has other important details to pay close attention to, such as how much space to leave for seasonal expansion and contraction between your flooring and the wall.
What Tools and Materials Do I Need?
In addition to your actual flooring, a number of tools and materials are necessary for installing your floor properly. Of course, a lot will depend on the specific method you choose, but here’s an idea of some of the items you’ll require:
- Measuring tape
- Pencil
- Chalk line
- Six-foot level
- Table saw
- Miter saw
- Mallet
- Spacers
- Underlayment
- Wood moisture meter
- Air Compressor with hose
- Floor nailer/stapler
- Fasteners (such as nails or staples specific for flooring)
- Protective gear (such as face masks and goggles)
Specific for glue or glue assist:
- Adhesive
- Caulk gun
- Trowel
Browse our wide assortment of flooring installation tools and materials to find what you’ll need for your tongue and groove project. You can also shop LL Flooring for the moldings and other accessories to complete the look of your new flooring.
Installation Methods and Basic Steps
Whichever method you use, you'll want to select the three longest, straightest boards to install for your first three rows.
Nail Down
This method involves securing your boards with fasteners appropriate for hardwood flooring. These can be nails or staples, depending on what’s recommended for your specific product. For nail-down floors, the groove will face the wall. Using a flooring nailer/stapler, you would secure your boards to the plywood or OSB subfloor, placing the fastener at an angle just above the tongue. Place the next row’s boards by fitting their grooves against the tongue of the fastened board. Then, using a mallet, tap the new boards in place for a snug fit.
Nail With Glue Assist
For this installation method, you would use a caulk gun to apply an approved wood floor adhesive under your boards before nailing them down. We recommend any flooring that’s 5 inches or wider be nailed with glue assist.
Glue Down
When gluing down hardwood, the tongue of your tongue and groove flooring should face the wall. Use a trowel to spread wood flooring adhesive on the floor before installing each row of boards, fitting them together as usual with the tongues and grooves. Allow the first row to set before continuing to additional rows to keep that row from moving during the rest of the installation. Gluing can help dampen noise underfoot and limit seasonal movement.
Engineered tongue and groove hardwood with a plywood core can be glued at the edges to float it above the subfloor.
Commonly Asked Questions and Additional Tips
Should the Tongue or Groove Go Against the Wall?
The groove side should go against the wall. But be aware that wood flooring requires space for seasonal expansion and contraction. Use spacers between your walls and flooring during installation to maintain the recommended distance. Your WIC guide will tell how much expansion space you should leave.
Do You Need Underlayment for Tongue and Groove Flooring?
We highly recommend using an underlayment under nailed-down hardwood flooring and engineered floating floors. Benefits include sound absorption and creating additional warmth and comfort underfoot. You’ll also get moisture mitigation if you use an underlayment that contains a moisture barrier.
How Much Does It Cost to Install Tongue and Groove Floors?
The cost to install tongue and groove flooring will vary on whether you’ve opted for professional installation or the DIY route. Particularly for DIYers, your cost will vary depending on how many tools and supplies you already have on hand and how many you have to purchase. If you’d rather turn this task over to the professionals, schedule a free estimate from our network of professional independent contractors.
Learning how to install tongue and groove wood flooring is crucial for quality results and a well-performing floor. Browse our Flooring 101 center for more installation guides, tips, and general information about hardwood and all the flooring types we offer here at LL Flooring. Need style tips and inspiration for your décor? We offer that, too!
ALSO, do you learn about home improvement and design with fun and informative videos? Subscribe to the LL Flooring YouTube Channel to learn more, leave comments or ideas that helped you, and join the community!
Related Articles


