

Vinyl Plank Flooring Installation Guide: Tap End
Vinyl Plank Flooring Installation Guide: Tap-End
Installation Preparation
Rigid Vinyl Plank Flooring / Engineered Vinyl Plank
1. CAUTION
- Do not install in wet areas like patios and showers, or in exterior areas
- Do not install over radiant heat.
- Do not install under permanent kitchen cabinets when floating
- Do not install on concrete unless proper moisture testing is conducted and documented.
- Do not install flooring with obvious visual defects.
2. STORAGE & ACCLIMATION
- Temperature can affect PVC products. For best product performance, ensure the temperature in the home is between 50º and 100º before, during, and after installation, and for the life of the flooring.
- Acclimation time is not required when the product and worksite are within the above temperatures. Products must acclimate for 24 hours, however, when temperatures exceed these recommendations.
- Product installed in homes with unregulated temperatures (summer or vacation homes, etc.) may experience gapping between planks or edge curling over time.
- Stack boxes flat, and no more than eight cartons high. Keep away from direct sunlight.
3. RECOMMENDED USE
- This product is recommended for residential or light commercial interior use only. See the product's warranty for details. This floor can be installed below, on, or above grade level.
- This flooring installs like laminate flooring. It may be floated with or without underlayment.
4. IMPORTANT PLANNING
- Always install in good lighting so visual defects can clearly be seen and discarded prior to installation.
- All other construction work should be completed prior to the installation of this product.
- It is recommended to have an additional box left over after installation, to be used for repairs if needed.
- For the best overall appearance, select planks from several boxes at a time when installing.
- A waste factor of at least 5% for cutting is recommended per order. Diagonal installations may require 15% to 20%.
- Provide a 3/8-inch expansion gap between the walls and floor, all around the perimeter of the floor and around any fixed objects. For areas 50 feet wide or more, a gap of 3/4-inch must be allowed.
- Areas greater than 50 feet in any one direction must be broken by expansion breaks between planks in the floor, typically at doorways or hallway entrances. These gaps are commonly covered with T-molding.
- Expansion breaks for 50-foot areas are not required when gluing the flooring planks to the subfloor.
- The flooring should be glued down in areas with direct sunlight exposure to the floor. In floating applications, windows and sliding glass doors should have proper cover to prevent direct sunlight to the flooring.
- Recommended adhesives are: Bostik LVT LockTM, GreenGrip and Duragrip, Mapei Ultrabond Eco 962®, and Eco Quicklay spray adhesive.
- Do not move furniture back onto the flooring until the adhesive has cured.
- When moving furniture and heavy equipment on the flooring, use luan board, plywood, or other similar covering to protect the floor.
- Moldings are needed to cover the expansion gaps along the walls, and when the floor edges transition to other floor coverings (carpet, tile, etc.)
- CoreLuxe is waterproof. However, in the event of a flood or significant water leaks, the planks should be removed to allow the subfloor to thoroughly dry before reinstalling
5. CRAWLSPACES
- If installing over a crawlspace you must have a minimum of 18 inches of air space between the ground and floor joist. Crawlspaces should have adequate cross ventilation. The ground of the crawl space must be completely covered with a minimum 6mil or thicker polyethylene moisture barrier.
6. WOOD SUBFLOOR
- Wood subfloors should be flat within 1/8" over a 6´ span, and 3/16" over a 10´ span. Sand down high spots, and fill in low spots with a Portland-based floor patch.
- Plywood subfloors should be a minimum 5/8" thick, OSB subfloors should be a minimum ¾" thick, and floor joists should be 16" apart.
- Wood subfloors must be dry and not exceed 12% moisture content. Test the subfloor moisture in several locations. Readings above 12% on average indicate elevated moisture from water leaks or dampness that needs to be corrected before installation can begin.
- Screw down loose or squeaky sections of plywood and replace areas that are damaged.
- The subfloor should be clean and free of protruding fasteners and debris.
- This flooring can be floated over any wood subfloor that meets the above requirements.
- This flooring can be glued to plywood and OSB subfloors only. Do not glue over particle board subfloors. Instead, install plywood (3/8") over the particle board prior to a glue down installation of this product.
7. CONCRETE SUBFLOOR
- Concrete should be flat within 1/8" over a 6´ span, or 3/16" over a 10´ span. Grind down high spots, and fill in low spots with a Portland-based floor patch.
- Caution: This floor is waterproof; however, moisture intrusions from concrete hydrostatic pressure, flooding, or plumbing leaks, along with high levels of alkalinity, can affect floor coverings over time. Moisture can also be trapped below the flooring and create mildew or mold. The installer - not the manufacturer - is responsible for making sure that site conditions, concrete moisture, and alkalinity are at suitable levels prior to installation of this floor.
- DO NOT INSTALL OVER WET OR DAMP CONCRETE. Ensure the concrete is dry. Concrete slabs must be at least 90 days old. High moisture in a concrete slab can cause water to condense or pool under the flooring. Moisture itself will not harm this product, but can cause mold growth under the floor, or may cause a highly alkaline condition to develop that can damage the flooring or weaken the glue over time.
- A MOISTURE TEST IS ALWAYS REQUIRED WHEN INSTALLING OVER CONCRETE. Moisture testing ensures the product is being installed over dry concrete. Acceptable tests are ASTM F1869 Calcium Chloride test, or ASTM F2170 relative humidity (RH) test. Slabs with moisture levels exceeding 3lbs per 1000sqft using the Calcium Chloride test, or over 75% when using the RH test, must have an appropriate moisture barrier installed between the concrete and flooring.
- Moisture protection for floating floor installations: 6-8 mil polysheeting with all seams completely taped.
- Moisture protection when gluing over concrete slabs: Bostik GreenGrip, a moisture protecting adhesive, or roller-applied Bostik D250 epoxy with Bostik LVT Lock or DuraGrip.
8. EXISTING FLOORS
- This flooring can be floated over existing clean, flat, dry, and well bonded/secured tile flooring, vinyl flooring, and hardwood flooring.
- This flooring can only be glued down to existing properly prepped flooring that has been approved by the adhesive manufacturer.
- Do not install this flooring over existing carpet flooring, cushioned vinyl flooring, or existing floating wood and vinyl floors.
9. INSTALLATION TOOLS
- Tape measure
- Jig saw
- Wall spacers
- Moisture meter
- Pencil
- Safety glasses
- Hammer
- Dust mask
- Chalk line
- Pull bar
- Table saw
- Miter saw
10. UNDERLAYMENT PAD FOR FLOATING INSTALLATIONS
- Underlayment padding is not required for the installation of this product. However underlayment pads can help smooth out minor subfloor imperfections, add extra moisture protection, insulation, and sound control properties. The Bellawood Premium, Bellawood Platinum, Quiet Walk, Eco Silent Sound, and Tranquility underlayment can all be used in conjunction with the floating installation of this product. It is recommended to install 6 mil polyethylene over all concrete floors prior to floating the floor.
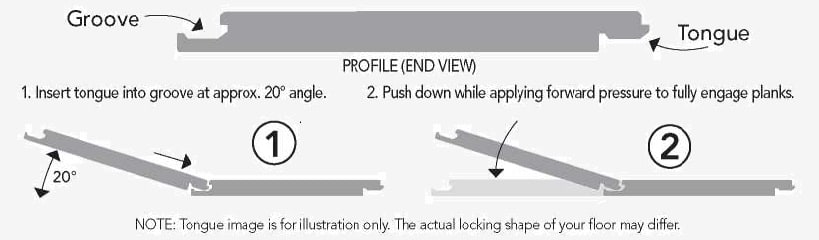
HOW TO ASSEMBLE TONGUE AND GROOVE PLANKS
11. FLOATING INSTALLATION
- Start installing parallel to the longest straightest wall, normally an exterior wall. Install the flooring pieces left to right. The groove side of the plank should be facing away from the starting wall.
- Using spacers, leave a minimum 3/8 inch expansion gap between the flooring and walls. Don't skip this important step!
12. LAYING THE FIRST ROW
- After laying the first plank, lay the second plank in position, and tap it toward the first plank to lock the ends of the boards together. Be sure to use a tapping block so you won't damage the boards with the hammer. Continue laying boards this way until you reach the other wall.
- See below for dealing with the last board in the row.
- See note in PLANNING section about rows longer than 50 feet.
13. LAYING THE SECOND ROW
- To start the second row, install the first plank, being sure the plank is at least 8 inches longer or shorter than the first board in the previous row. There should be a minimum 8" stagger between any one joint and the nearest joints in adjacent rows. Planks used to start or end a row should be at least 6" long.
- Next, install the second plank in the second row by inserting the tongue side into the groove first, then pressing the board down, locking it into the previous row. Then tap the board on its end with a tapping block & hammer to lock it into the previous board.
14. CONTINUE
- Continue installing rows, working left to right, adding additional planks in each row, while maintaining a minimum 8 inch stagger between adjacent-row joints.
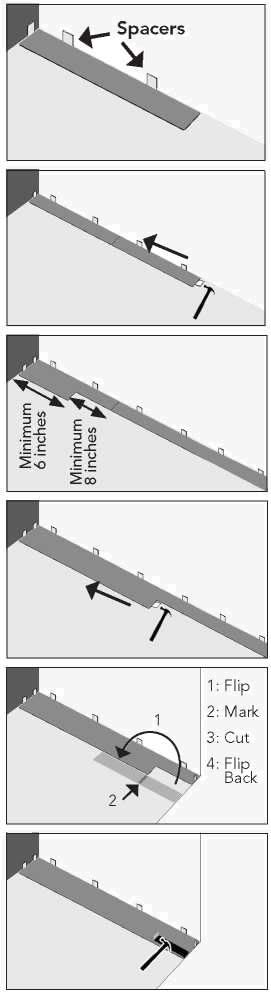
15. CUTTING END-OF-ROW BOARDS
- The last board in each row should be cut to fit, while still maintaining a 3/8 inch expansion gap at the wall. Here's how:
- Flip the board over (placing the groove to your left.)
- Measure the board by the gap in the row.
- Mark and cut the board using a miter or table saw.
- Then flip the board back over, and it will be ready to insert and be tapped into place.
- You may use the remaining piece to start the next row.
16. USING A PULL BAR TOOL
- Use a pull bar to lock in the last plank in any row.
- Use a pull bar to lock in the last row of flooring being installed in that room.
17. INSTALLING AROUND OBJECTS
- Use a hole saw drill bit to make perfect cuts for pipes.
- Use a jamb saw to cut door frames.
- Use a jig saw for cutting pieces around irregular shapes.
18. AFTER INSTALLATION / FLOOR CARE & MAINTENANCE
- Sweep up all trash and debris
- Save extra material and store it in a climate controlled space.
- Save one box label in case future product is needed for repairs.
- Install trim to cover expansion gaps, and transitions where the new floor meets other existing areas.
- Properly protect the flooring before moving furniture back into place.
- Use felt protectors on furniture legs
- Dream Home or Bellawood brand floor cleaners are recommended for cleaning the floor.
- Avoid sun exposure to the flooring for long periods. Close blinds and drapes during peak sunlight hours. Excessive heat can cause expansion and warping of the product.
- Caster wheels should have wide rubber casters. Non-staining, protective mats are required under rolling chairs. Do not use plastic mats, as the urethane in the mats may bond with the floor.
- Use walk-off mats at entrances to prevent grit and dirt from being tracked on the floor.
- Sweep or vacuum the floor regularly. Use a vacuum designed for hard surface floors that does not have a beater bar. Or, the beater bar should be turned off.
- Do not use polishes, waxes, harsh chemicals or abrasive cleaners on this floor.
- Wipe up spills immediately with a damp cloth.
© 2016 Lumber Liquidators EVP-001-02
ALSO, do you learn about home improvement & design by watching informative videos? Please subscribe to the LL Flooring YouTube Channel, leave comments, submit ideas that helped you, and join the community!
In the video below Mark shows a magic trick to try with each flooring installation that homeowners love, then demonstrates key steps that take place prior to the installation of planks.
And in this video Wade demonstrates Tap - End Installation with many points to think about along the way..